Thursday, February 10, 2022

Day10 - Ansible intro

 2/10/2022 - class notes

- ansible/terraform


Recap

master

nodes

cronjob

initcontainers

ingress

daemonset

statfulset


---------------------------

eks/aks/openshft


jenkins

docker

k8s


=================

Ansible


configured manually


ssh to host

install

configure

services


10 servers need to install

100 servers


webserver

dbserver

proxy server


1 - servers - 10 minutes

10 - servers -> 30-60 minutes


Avoid manual

- automate


3 nodes


1 loadbalancer


10 more

image

vm

package

file

service


bootstraps


configuration management code


code

remote side execution

feedback/report


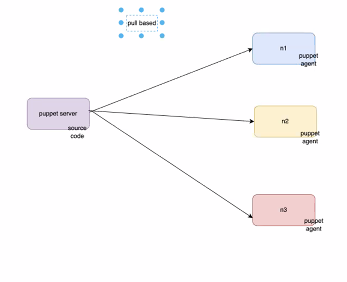
Puppet, Chef (pull based architecture)

puppet

- puppet master (holds the code)

- puppet node (install puppet agent, agent pulls the code from server and executes)


  • Request

  • Catalog

  • Report 

You have to maintain the server. It may be expensive to maintain. To avoid this kind of tool, they came up with push based architecture.

- simple and clean

- easy to understand


Push model …

Agent less

Python 


Need to develop a python based framework. Write code on python.


Ansible.

- need ssh communication

- push model

- ssh 

- no agent needed.

- develop source code


DSLs - Domain specific language

- derived from the base programming language.

- python

- yaml 


Ansible

- easy to learn

- written in python

- Easy to install and configure

- no need to install ansible on client

- Highly scalable..


How does it works?


Using ansible playbooks, which are written in a very simple language: yaml


Configuration management

Run from the server and the target server is configured automatically.


Architecture

Master

- playbook

- inventories

- Modules

- List of hosts

- Where playbook task


Minimum 2 hosts required. Master/node

1. Ansible host

2. Host


Lets go ahead and create instances.

- Create 2 aws instances. T2-micro or small.

- security group - launch it.

Tag: ansible-host, node01


Login to ansible host


# which python3 - it is available by default

/usr/bin/python3


# which ansible # not available. We have to install it


# apt update/upgrade


# apt install ansible # try to see if you can install


VMS 

Puppet => agent/pull/ruby based

Check => agent/pull/ruby

Ansible => agent less/push/python

Salt => agent/push/python


Out of these ansible is simple. 

puppet , chef faster, secure

Salt is also security wise good tool.


# ls -l /usr/bin/ansible


Ansible => ad-hoc commands

Ansible-playbook => yaml


1. Maintain inventory file

# hostname -i

Get the ip address - private (in our case)

# cd /etc/ansible; ls -l 


# vii hosts


# ansible -i hosts all -m ping 

Permission denied.


We have to authenticate it. 


Ansible modules list

# ansible -i hosts al l-m ping -u root -k

ssh password:


It will prompt you for a password.


But it failed again. Authentication is denied for this user to login remotely.


Generate key

# ssh-keygen

# ls -l .ssh


#copy public key to client system at host_dir/ .ssh/authorized_keys


# vi /etc/ansible/ansible.cfg


Enable configuration here. 

# host_key_checking = False

# log_path = /var/log/ansible.log


# ansble -i hosts all -m ping


ansible -docs

—----------------

# ansible -i hosts <groupname or ip> -m apt -a “name=tree state=latest

# ansible -i hosts all -m apt -a “name=tree state=latest””


No package matching available.


Since its a brand new machine, we have to update.

# ansible -i hosts all -m apt_repostory -a “repo=ppa:nginx/stable”


It's going to update the repository. Now run,

# ansible -i hosts all -m apt -a “name=tree state=latest”

Look for the output.


# which tree


Run the same command 2nd time, you get green color. First time, you see yellow color.

2nd time, you see change = falst. 

If package is already installed, it does not do nothing. It is called idempotent.

Desire state is not changed. 

# ansible -i hosts all -m apt -a “name=tree state=absent”

Yellow color

Run it again, you get green color


Run it again,

# ansible -i hosts all -m apt -a “name=tree state=latest”

It will install and shows yellow color.


You can run one command at a time. This command is called ad-hoc command. If you want to run multiple command, you can’t do this way. How can you achieve running multiple command?

- by using yaml file.


# cat example.yaml

# cat nginx.yml


Google

How to install nginx server manually on ubuntu?

1. Install nginx pkg

 $ sudo apt update; sudo apt install nginx

2. Create our website

<html></html>


3. Set up virtual hosts

4. Activate virtual host and test the result


# ansible -i hosts all -m apt -a “name=tree state=latest”

# cat nginx.yml

  • Hosts: remote  # define host group, ip

tasks:

  • Name: add repo

  • name: install package nginx

apt:

  Name: nginx

  state: latest 


Vi /etc/ansible/hosts

[remote]

192.168.10.20

192.168.10.21

….


# cat nginx.yml

---

- hosts: remote  # define host group, ip

  tasks:

  - name: add repo nginx

    apt_repositiry:

      repo: "ppa:nginx/stable"

   -name: install package nginx

      apt:

        name: nginx

        state: latest


   - name: start service ngins if not started

     service:

       name: nginx

       state: started

  name: install package nginx

apt:

  Name: nginx

  state: latest 


============================

service(package a, state b) {

return a+b;

}

- name: add methid

  service:

    package: nginx

    state: started


add (int, int b) {

return a+b;

}


add a=10, b=20

- name: add method

  add:

   a: 10

   b: 20

==============================

---

# now need to start service

go to service module -> go under examples...


Vi /etc/ansible/hosts

[remote]

192.168.10.20

192.168.10.21

….


# ansible-playbook -i hosts nginx.yml


just observer the output

- remote

- gathering facts

- add repo

- install package nginx

- start service ngins

- play recap


changed=1


get the ip address of the host and paste at the browser, you will see nginx page.


# cat nginx.yml

---

- hosts: remote  # define host group, ip

  tasks:

  - name: add repo nginx

    apt_repositiry:

      repo: "ppa:nginx/stable"


  -name: install package nginx

      apt:

        name: nginx

        state: latest


   - name: start service ngins if not started

     service:

       name: nginx

       state: started


   - name: create a dir tutorial # google for file module, look for eg,

     file:

       path: /etc/myfile.txt

       state: directory


    - nameL copy index.html file

      copy:

        ser: index.html

        dest: /var/www/tutorail/index.html


    - name start nginx if not started

      service:

        name: nginx

        state: started


# we have to create virtual host


   - name copy tutoril

      copy:

        ser: tutorial

        dest: /var/www/tutorail/tutorial


once  you updated, or modified, we have to restart the service. 

we have to speacify nofity 


changed=1


get the ip address of the host and paste at the browser, you will see nginx page.


# cat nginx.yml

---

- hosts: remote  # define host group, ip

  tasks:

  - name: add repo nginx

    apt_repositiry:

      repo: "ppa:nginx/stable"


  -name: install package nginx

      apt:

        name: nginx

        state: latest


   - name: start service ngins if not started

     service:

       name: nginx

       state: started


   - name: create a dir tutorial # google for file module, look for eg,

     file:

       path: /etc/myfile.txt

       state: directory


    - nameL copy index.html file

      copy:

        ser: index.html

        dest: /var/www/tutorail/index.html


# we have to create virtual host


   - name copy tutoril

      copy:

        ser: tutorial

        dest: /var/www/tutorail/tutorial


    - name start nginx if not started

      service:

        name: nginx

        state: started

      notify: restart service ngins

     handlers:


    - name: start servie ngins, 

      service:

       name: nginx

       state: restarted


# cd /etc/ansible

$ vi tutorial


jenkins ubuntu install


convert commands into yaml and try it 


jenkins.io/doc/book/..


# ansible-playbook -i hosts nginx.yml


review the output..


green color, already perfored, yellow color, its performed now.


go to browser

1p:81 => you see the content.


next class ...

- ansible roles, running multiple service 

- terraform, monitoring


Wednesday, February 9, 2022

Day9 - kubernetes pod, configmap, statelful

 2/09/2022 - Class Notes
ReCap from last class
Configmap
Probes
PV
PVC
Storage class
----------------
Todays agent
create container
 - statefulset
 - helm
 - cronjobs
 - Stateful set
AWs authentication
- EBS volume
- PVC
read about 
job
initcontainer
daemonset

===============
nebulawsworks.com/insights/posts/leaveraging-aws-ens-for-kubernetes-persistent-volumes
- try to use ansible/terraform to recreate your cluster.
- using the tool, you can create and destroy rather then  manual tasks. 
---------------------------
Job and service
job - executes command/script one time. its an one time job. How do we run a particular command in job?
what is job in k8s?
A Job creates one or more Pods and will continue to retry execution of the Pods until a specified number of them successfully terminate. As pods successfully complete, the Job tracks the successful completions.

pod
images
-------
marvel
perl
ruby
python
How to run the image one time?
$ docker run python python abc.py
$ docker run <python-image> python abc.py
https://kubernetes.io/docs/concepts/workloads/controllers/job/
Read this link line by line
$ vi job.yml
apiVersion: batch/v1
kind: Job
metadata:
  name: pi
spec:
  template:
    spec:
      containers:
      - name: pi
        image: perl
        command: ["perl",  "-Mbignum=bpi", "-wle", "print bpi(2000)"]
      restartPolicy: Never
  backoffLimit: 4
$ kc apply -f job.yml
$ kc describe
$ kc logs $pods
$ kubectl apply -f job.yml
$ kc get pod --watch
$ kc get pods
pods are created
$ kc logs pi-rdf5t
CLean up finished jobs automatically
- cronjobs
TTL mechanism for finished jobs
https://kubernetes.io/docs/concepts/workloads/controllers/cron-jobs/
crontab.guru
$ cat cronjob.yaml
apiVersion: batch/v1
kind: CronJob
metadata:
  name: hello
spec:
  schedule: "* * * * *"
  jobTemplate:
    spec:
      template:
        spec:
          containers:
          - name: hello
            image: busybox
            imagePullPolicy: IfNotPresent
            command:
            - /bin/sh
            - -c
            - date; echo Hello from the Kubernetes cluster
          restartPolicy: OnFailure
$ kc apply -f cronjob.yaml
$ kc get svc -n kubernetes-dashboard
31617
httpS://get-the-nodeIP:port
[00:27:00]

$ kc get cronjob
$ kc delete confjob hello
check on k8s dashboard

cleanup all the executed/completed jobs for every 12 hours.
$ kc delete jobs name
initcontainer
-------------
sidecar
configmap -> we are injecting data to the pod using config object. But the data is static. 
static vs dynamic
static -> manual -> persistance volume
dynamic -> wihtout your intervention.
we want dynamic data or dependensive data.
https://kubernetes.io/docs/concepts/workloads/pods/init-containers/
Init containers are exactly like regular containers, except:
Init containers always run to completion.
Each init container must complete successfully before the next one starts.
If a Pod's init container fails, the kubelet repeatedly restarts that init container until it succeeds. However, if the Pod has a restartPolicy of Never, and an init container fails during startup of that Pod, Kubernetes treats the overall Pod as failed.

google "ansible awx docker compose"
https://github.com/geerlingguy/awx-container/blob/master/docker-compose.yml
$ cat initcontainer.yml
apiVersion: v1
kind: Pod
metadata:
  name: myapp-pod
  labels:
    app: myapp
spec:
  containers:
  - name: myapp-container
    image: busybox:1.28
    command: ['sh', '-c', 'echo The app is running! && sleep 3600']
  initContainers:
  - name: init-myservice
    image: busybox:1.28
    command: ['sh', '-c', "until nslookup myservice.$(cat /var/run/secrets/kubernetes.io/serviceaccount/namespace).svc.cluster.local; do echo waiting for myservice; sleep 2; done"]
  - name: init-mydb
    image: busybox:1.28
    command: ['sh', '-c', "until nslookup mydb.$(cat /var/run/secrets/kubernetes.io/serviceaccount/namespace).svc.cluster.local; do echo waiting for mydb; sleep 2; done"]

- resource limit
  - cup/mem you can specify to container definition parameter...

baackground pods
- I don't want to access pod, but want them to be running like agent.
backup, log collector, garbage collector, metrics collectors
lets say we have log generated and need to forward to some other location. 
this kind of service, we call it daemonset in k8s.
logs - any issue, any transaction failed.
metrics -> resource utilization

initcontainer
- dynamically give data to your container ics init container while booting
 sidecar docker, 
A sidecar is a utility container in a pod that's loosely coupled to the main application container. 

Deploy jenkins as a pod?
What is disadvantage to run as a replica?
- replica can't work on this jenkins schenario because jenkins is going to use the filesystem.
- jenkins does not support active/active sesssion
lets take a database.
mysql pod -> deploy
as usual it usage pv, if you want to create a replica, how it is going to do?
if it was web appliation, its going to use multiple replicas.
if its a stateless application, we could use. even it shuffel between the nodes, we can still use. most frontend application, we can use it. it does not keep any state. you won't loose anything but in case of jenkins, you loose data. 
in case of data say mysql, if you want to create a multiple instance of mysql, you can't do it.
database if you want to use it, do "write once, use one."
you can have read replicas.
one primary and other are going to be readreplicas.
How can you create this kind of architecture. 
- you have to maintain the state. 
thats why, k8s came up with concept for database pod. 
they came up with idea stateful sets.
- how it is maintaining?
as usual, how are you going to create deployment?

read replicas going to be sync with primary pod automatically.
rds mysql cluster
kind: StatefulSet
https://kubernetes.io/docs/concepts/workloads/controllers/statefulset/
https://bmc.com/blogs/kuberneste-postgresql

static IPaddress
application loadbalancer
create ipaddress and attach it.
type: loadbalancer (application load balancer)
service:
route: pathbased routing
url/admin
url/user
in k8s - assign certificate, dns
ingress object,
how to use it?
https://kubernetes.io/docs/concepts/services-networking/ingress/
package managers
----------------
file will be extrated and stored in a relevent location.
pip
gem
yum
apt
npm
rpm
dpkg
get file from repo, extract and distribute among different directories.
kubernetes
helm 
 packager manager
package
yml
 - dev
 - test
 - prod
helm packages
$ helm install
$ helm get -h
https://helm.sh/docs/intro/using_helm/
install helm on your client side
- install nginx
$ helm install nginx
look for syntax for directory structure.
------------------------
tomorrow
- ansible/terraform


Monday, February 7, 2022

Day7 - k8s RC, RS, Deployment, Taint tolerance ..

2/07/2022 - Class Notes

ReCap from last class

- k8s
  - Architecture
  - Master node
  - Worker Node
  - Client (Your PC)

  - Configure Master, Worker, Client
  - kubectl 
    - using ad-hoc command
    - using yaml file

  - run command
  - expose command

yaml files
- pod.yaml
- service.yaml
- nginx.yml

yaml file contenet
apiVersion:
Kind
Metadata
spec:


pod has pod definition
service file has service definition

Go ahead and start aws instance or your VM.
$ ssh -i rsa_user user@ip

# kubectl get node
Master -> control-plane, master

# kubectl get pod

# kubectl get svc
  exposing service

# kc get svc nsserv -o yaml
# kc get pod ns -0 yaml


a service is a ogical set of pods and acts as a gateway, allowing ..

- we need multiple pods. How can we service multiple pods? how many ways we can create pods?

We are going to use replication set, replica-set or deployment.

service can decide how to manage pods. 

search for workload resources: 

https://kubernetes.io/docs/concepts/workloads/

Replication controller
a replicationcontroller rnsures that a specified number of pod replicas are running at any one itme. in other works, a replicationcontroller 


search for pod 
-> look for pod definition.

Search for replication controller

eg,

apiVersion: v1
kind: ReplicationController
metadata:
  name: nginx
spec:  # replication control spec
  replicas: 3
  selector: 
    name: nginx
  template: # pod definition
    metadata:
      name: nginx
      labels:
        app: nginx
    spec: # pod definition
      containers:
      - name: nginx
        image: nginx:1.14.2
        ports:
        - containerPort: 80

Would they be running on same node or on different?

schedular will decide on what node to create?

# vi rc.yml
# kc delete pod n1
# kc delete svc n1serviec
# kc get svc

# kc apply -f rc.yaml

# kc get -f rc.yml
you see desire, current, and ready
# kc get rc
# kc get pod

under name section, you see name attach..

RC is tightly coupled here. job is going to run at particular node only. if node is not available, job is on the queue.
multiple node with label?

instead if selector, for multiple label, we will use replica set.

apiVersion: apps/v1
kind: ReplicaSet
metadata:
  name: nginx
spec:
  # modify replicas according to your case
  replicas: 3
  selector:
    matchLabels:
      app: nginx 
  template:
    metadata:
      name: nginx
      labels:
        app: nginx
        env: dev
    spec:
      containers:
      - name: nginx
        image: nginx:1.14.2
        ports:
        - containerPort: 80
# vi rs.yml

# kc apply -f rs.yml

# kc get pod

# kc delete -f rc.yml

# kc get rs
# kc get rs -o yaml # yaml file output

# kc get rs (replica set)
# kc describe rs 

# kc get pod
# kc delete pod nginx-abdfd
# kc get pod

# same number of pods.
cluster will always maintain 3 replicas all the time.


if you want to update,
just change the image: nginx:latest

# kc apply -f rs.yml

# kc get pod

# kc get pod nginx-dfssd -o yaml

look at the image version of the output.
spec"
 containers:
 - image: nginx:version

# kc get pod

# kc delete -f rs.yaml
# kc apply -f rs.yml

updating is a problem with replica set. All of the pods will be updated. your system may be down. couple of sec/minutes of downtime.

There is another method called 'deployment' All three options are good but 

lets say you want to update canery or blue greeen , or percent wise update. that time, you want to update on control rate rather then one time. 

you can use 'deployment'

only different is that you will be using object on deployment.

$ cat dep.yml
apiVersion: apps/v1
kind: Deployment
metadata:
  name: nginx-deployment
  labels:
    app: nginx
spec:
  replicas: 3 # rollout
  selector:
    matchLabels:
      app: nginx
  template:
    metadata:
      labels:
        app: nginx
    spec:
      containers:
      - name: nginx
        image: nginx:1.14.2
        ports:
        - containerPort: 80

# kc delete -f rs.yml

# kc get pods
nothing is there

# vi deploy.yml
paste the content above.

# kc apply -f deploy.yml

deployment is created.

# kc get deployments

# kc rollout status deployment/nginx-deployment

# kc get deployments

# kc get rs  # replica set, it will show there as well.

modify

# kc get pod
there pods are running


# kc set image deployment.v1.spps/nginx-deployment nginx=nginx:1.16.1

# kc edit deployment/nginx-deployment

image: 1.16.1 # change the versio under spec: containers:

its modified automatically

# kc get pod

kc rolllout status deployment/nginx-dployment

you will see message -  old replicas are on pending termination 


# kc get rs
update is graceful shutdown. when deployment is running, it will wait until all job on the pod is completed.

so, we see we will use deployment to update your product.

search for service on k8s documentation.


apiVersion: v1
kind: Service
metadata:
  name: my-service
spec:
  selector:
    app: nginx
  ports:
    - protocol: TCP
      port: 80
      targetPort: 9376

# cat deploy.yaml

# kc get expose --help

you can use possible resource.

we have 
selector:
  app: myapp


expose outside
$ cat svc.yaml

spec:
  type: NodePort

# kc apply -f svc.yaml
# kc get svc


Dashboard
Simple example

How to create a dash board and deploy a micro service.

google for k8s dashboard

$ cat dashboard.yml 

ServiceAccount - object
apiVersion: Namespace
metadata:
  name: kubernetes-dashboard

what is role?
- its a permission, priviledge.
it contens roles, resources.

user define rules

cluster level roles
- clusterrole
and we bind with user.

assign permision based on the role to the user.

role binding - service account 
 - service account is just like a user. it is binded with certain roles, clusterRolebinding, role binding.

# kc apply -f recommended.yaml

# kc get pod -n kubernetes-dashboard

# kc get svc -n kubernetes-dashboard

how to modify?
download and apply or use the edit command

# kc edit svc -n kubernetes-svc kubernetes-dashboard 

Change from clusterip to NodePort

# kc get svc -n kubernetes-dashboard

you see type and ports different now..

port: 31687

get the ip of your node and use ip to access
https://ip:port

option
- token
- kubeconfig

how to get token

follow the guide create an authentication roken (rbac)
https://github.com/kubernetes/dashboard


create clusterrole binding

# vi user.yml

add service bindng

# kc -f user.yml 

# kc -n kubernetes-dashboard get secret $(kubectl - kubernetes-dashboard get sa/admin-user -o jsonoath="{.secrets[0].name}) =o go-template='{{.data.token | base64decode}}"

# kc -n kubentes-dashboard get sa/admin-user
# kc -n kubernetes-dashboard get sa/admin-user -o yaml

# kc -n kubernetes-dashbard get secret admin-user-token-mbkg8 -o yaml

# vi token
# cat token | base64decode

copy the =token and go to dash board and paste under token section 

now, you have access to dashboard.

where the pods are deployed?
# kc get pod
# kc describe pod <pod-name>

you will see under events what node deployed to.

or you can go to dashboard
go to default dashboard
go to pods and you will find it.


how do I deploy windows app (.net app?)?

or a linux server with 16gb of ram.

you want to select the node rather then randomly selecting it. You want to select your node based on your requirement.

- We will use nodeDelector option.

how to declare nodeSelector?
go to k8s web page and serch nodeselector

assigning pods to Nodes.


nodelecector:
  disktype: ssd

# kc get node

how to know what node to select?
use selector, level

# kc describe node <node-name> 

you will see namespace, allocated repsources, system resources, capacities.
look for labels

you have to specify values based on key-> value paid.

nodeSelector

multiple filter, 
afinity/anti-affinity

provides multiple options.


To select the pod, you can use these three options,
- nodeSelector
- Node affinity
- node anti-affinity

There is another option
Taint and tolerations

taint -> 
tolerations ->

k8s.io  - search for taints

search for taints and tolerations

# kc taint nodes node1 key1=value1:Noschedule

read about taint and toleration

======================
tomorrow,
configmap
pv
pvc
storageclass
ingress
statefulset
jobs

================

Today, we created
- pod, svc, rc, rs, deployment
- dashboard, tocken
- Controlling purpose -> NodeSelector, affinity, taint, toleration

# kc taint ...
# kc describe 

Thursday, February 3, 2022

Day 6 - Kubernetes in depth

2/03/2022 - class note
Docker, Docker compose
Recap
Orchestration Frame
Clusters
Swarm
K8s
Master 
Nodes (pool of worker nodes)

Master node
API server
Controller Manager
Scheduler
ETCD
kubeadm
Worker Node
- kubectl
- Kube-proxy
- PODs

How to configure k8s using kubeadm?
- Create 2 VMs per cluster
- 1 VM -> client (it can be your PC/Laptop)
How to configure?
- Login to AWS console
- Select your region
- You need elastic IP
- Go to instances to see if you have existing instinaces
- Go to services -> EC2
- Select ubuntu t2.micro (two instances) if you want to load jenkins or other program, use medium.
go to kubernetes.io and search for kubeadm
- look to installation
- look for requirement, you need to use t2.medium. 2GB, 2CPU
- add storage, security group. ssh enable
your 2 instances are ready. Create other 2 as follow
k8s-master - t2 medium
k8s-node01 - t2.micro
k8s-node02  - t2.micro
k8s-client (Treat this like a client pc, jump host, bastion host)
Login to each instances node01, node02, master, and client
Now, we have to install required utility on master and nodes.
follow this guide,
https://github.com/qfitsolutions/k8s/blob/master/k8s-master
CNI - container network interface.
@master, and both node, run the following command,
apt-get update && apt-get install -y apt-transport-https && \
apt install docker.io -y && \
     systemctl start docker && \
     systemctl enable docker && \
curl -s https://packages.cloud.google.com/apt/doc/apt-key.gpg | apt-key add - && \
cat <<EOF >/etc/apt/sources.list.d/kubernetes.list
deb http://apt.kubernetes.io/ kubernetes-xenial main
EOF && \
apt-get update && \
apt-get install -y kubelet kubeadm kubectl kubernetes-cni

Enable cgroup driver, otherwise kubelet will not start. Run it on node side and restart the docker.
cat <<EOF >/etc/docker/daemon.json
{
  "exec-opts": ["native.cgroupdriver=systemd"]
}
EOF
systemctl restart docker
systemctl status docker

# kubeadm
you will see the output
available commands
look at init option, k8s control plan,
join - to join existing cluster
token - manage token..

Now, you have to initialize
kubeadm init --ignore-preflight-errors all   
or
sudo kubeadm init --control-plane-endpoint "PUBLIC_IP:PORT" --ignore-preflight-errors all 
Review all the output.
Your control node is initialize successfully.
You can join any number of worker node. Copy the join command and execute on worker nodes.
Static pod - kubelet is going to be managed, api server, etcd, kube systems.. kube-proxy
You have to config kube config by running the command below,

mkdir -p $HOME/.kube && \
sudo cp -i /etc/kubernetes/admin.conf $HOME/.kube/config && \
sudo chown $(id -u):$(id -g) $HOME/.kube/config
cat .kube/config 
you will see very important info
server: https:ip:port
https://ip:6443
if IP is public, you can reach from anywhere.
kubectl is a client command.
# kubectl get node
check status: NotReady
Role: control plane.
---------------------------------
You also have to deploy pod network.
go to kubernetes.io installation page and see add-on, networking and network policy
There are lots of policy
- calico 
- Flannel 
- Weave net - We will use it. click on the link 
  it cana be installed on CNI-enabled k8s cluster. we used this option so we should be able to use it
kubectl apply -f "https://cloud.weave.works/k8s/net?k8s-version=$(kubectl version | base64 | tr -d '\n')"
- service account created
- authorization, role binding
- daemonset - going to run background process such as agent. like kubelet, 
now run kubectl command
# kubectl get node 
you will see status: ready
# kubectl get pod
what is pod?
- it's a container. 
k8s devide memory into multiple namespace. namespace holds logically spliting memory. 
# kubectl get pod --all-namespaces
coredns
etcd-ip
kube-apiserver-ip
kube-controller-manager-ip
kube-proxy-2

Now, lets go to node systems and run the join command.
#Note: get kubeadm join command from k8s master and execute like below command:
#kubeadm join 172.31.26.24:6443 --token hpnfgz.52pq3e95hrsz68c6 --discovery-token-ca-cert-hash sha256:92f783e806fb2b0bd36c2847d276847e78a14e07f86256cdbb4f3d79b9618df8

read the output carefully
you will see message that node has join th cluster
go to master node and run
# kubectl get node
Now, go to 2nd worker node and execute the join command. once done, go to master node and run
# kubectl get node
you will see one master and 2 nodes.
see under Roles.
# cat .kube/config 
copy the config file output and paste under home dir on client node.
apt-get update && apt-get install -y apt-transport-https && \
apt install docker.io -y && \
     systemctl start docker && \
     systemctl enable docker && \
curl -s https://packages.cloud.google.com/apt/doc/apt-key.gpg | apt-key add - && \
cat <<EOF >/etc/apt/sources.list.d/kubernetes.list
deb http://apt.kubernetes.io/ kubernetes-xenial main
EOF && \
apt-get update && \
apt-get install -y kubectl kubernetes-cni
cat <<EOF >/etc/docker/daemon.json
{
  "exec-opts": ["native.cgroupdriver=systemd"]
}
EOF
systemctl restart docker
systemctl status docker

# mkdir .kube
$ vi ./kube/config

k8s-client -> k8s-Master -> k8s-node01|k8s-node02]
PC/Laptop -> k8s-Master -> k8s-node01|k8s-node02]
google
"aws kubeconfig update"
aws eks update-kubeconfig --name example (cluster name)

goto your pc, under home, crete .kube/config 
and paste the content
# kc get node
you should get output. If it hangs, go to congig and get the public IP and paste on server line..
try again
$ kc get node
invalid certificate
cert is generated backed on IP so you may get cert error. If everything is good, result is good.

Can we have multiple master nodes in k8s?
- yes, but you can have multiple components on different nodes. spilit the componenet
- create high availabliity cluster with kubeadm
- high availibity etcd and so on..
next, how to deploy application on k8s
break time...
We want to deploy pod
to start pod, 
kubectl run command
kubectl -> kc
kubectl run
kc expose
# kubectl
you will see detail help output
look under basic commands
create -
expose -
run - 
set - 
Lets look at these two commands: expose and run
expose - take a replication controller, service, deployment or pod and expose it as a new k8s service
run - run a particular image on the cluster

# kc run --help
see th eusage..
review the output, go through the exaples.
# kubectl run n1 --image=nginx:latest --port=80
podname=n1
image=ngins
port-> 80
# kc get pods
Status: containerCreating
===================================
Q. Can we host private registry on our on-prem env?
go to hub.docker.com
search for "registry". just use it.
===================================
# kc describe n1
How can you access. lets say pod is deployed to node02.

# kubectl expose --help
read the help output

# kubectl expose pod n1  --port=80 --target-port=80 --name=n1service --type=NodePort
--port=80 is your nginx port
target-port=80 is service port
n1service - is the name of service we just gave.
What is service?
a service represents a logincal set of pods and acts as a gateway, allowing (cielnt) pods to send requests to the service without needing to keep track of which physical pods actially make up the service. so basically now servie will redirect the consumer to the actual working pod.

service types,
cluster-ip ->  cluster level
NodePort - node level
Loadbalancer - use external (public) IP, you can use it.
# kubectl get svc
# kc describe svc n1service
Type: NodePort
selector: run=n1
clusterip -> private ip, such as database, use local ip
Nodeport - web site -> you use public ip, so you can use nodeport is going to be used. node port is like bridge port. it enable the port forwarding.
LB - You can use loadbalance for public IP.

google for "static ip in service gke"
get the node IP and use at the browser, you will be able to access the nginx default page.
http://ip:32703

Kubernetes dashboard,
github.com/kubernetes/dashboard
kc describe svc n1service

rather than running commands, we can convert command line option to yaml file.
$ mkdir feb22
open it on vs code
FEB22
 - k8s-example
    pod.yml
kc describe svc n1service
kubectl expose pod n1  --port=80 --target-port=80 --name=n1service --type=NodePort

lets convert these two cmmmands into yaml
what we need is
apiVersion: v1
kind: Pod # what we want, pod
metadata:
  name: n1
  labels:
    app: n1
    env: dev
  namespace: dev
spec:
  containers:
  - name: nginx
    image: nginx:latest
    ports:
    - containerPort: 80

---
apiVersion: v1
kind: Service # what we want, service
metadata:
  name: n1service
  labels:
    app: n1
    env: dev
  namespace: dev
spec:
  Type: NodePort
  selector:
    app: n1
  ports:
    - protocol: TCP
      port: 80
      targetPort: 80


@k8s.io site, search for service.

# kc get ns
you see default namespace.
You want your own.
# kc create ns dev
dev namespace is created.
# kc delete ns dev
you can create namespace using yaml file.
google for namespace and how to create it.

---
apiVersion: v1
kind: Namespace
metadata:
  name: dev
 
* - means list.
$ vi nginx.yaml
#kubectl run n1 --image=nginx:latest --port=80
#kubectl expose pod n1 --port=80 --target-port=80 --name=n1service --type=NodePort
apiVersion: v1
kind: Namespace
metadata:
 name: dev
---
apiVersion: v1
kind: Pod
metadata:
 name: n1
 labels:
   app: n1
   env: dev
 namespace: dev
spec:
 containers:
 - name: nginx
   image: nginx:latest
   ports:
   - containerPort: 80
---
apiVersion: v1
kind: Service
metadata:
 name: n1service
 labels:
   app: n1
   env: dev
 namespace: dev
spec:
 type: NodePort
 selector:
   app: n1
 ports:
   - protocol: TCP
     port: 80
     targetPort: 80

# kc apply -f nginx.yaml
# kc get pod -n dev
next week helm 
read yaml file, write yaml file.
https://raw.githubusercontent.com/kubernetes/dashboard/v2.5.0/aio/deploy/recommended.yaml
k8s
terraform
ansible


---------------------------------

apiVersion: apps/v1
kind: Deployment
metadata:
  name: ais-ifm
  labels:[InternetShortcut]
URL=https://codeshare.io/WdlgYy

    app: nice
spec:
  replicas: 1
  selector:
    matchLabels:
      app: ais
      tier: web
  template:
    metadata:
      labels:
        app: ais
        tier: web
    spec:
      containers:
      - name: tomcat
        image: tomcat:latest
        ports:
        - containerPort: 8080
        resources:
          limits:  
            cpu: 1000m
            memory: 600Mi             
          requests: 
            cpu: 500m
            memory: 300Mi
      - name: nginx
        image: nginx
        ports:
        - containerPort: 80
        resources:
          limits:  
            cpu: 400m
            memory: 200Mi             
          requests: 
            cpu: 200m
            memory: 100Mi


---


apiVersion: v1
kind: Service
metadata:
  name: ais-service
  labels:
    app: ais
spec:
  ports:
   - name: tomcat
     port: 8080
     targetPort: 8080
   - name: nginx
     port: 80
     targetPort: 80
  type: NodePort
  selector:
    app: ais
    tier: web
    

Git branch show detached HEAD

  Git branch show detached HEAD 1. List your branch $ git branch * (HEAD detached at f219e03)   00 2. Run re-set hard $ git reset --hard 3. ...